This is an old revision of the document!
Table of Contents
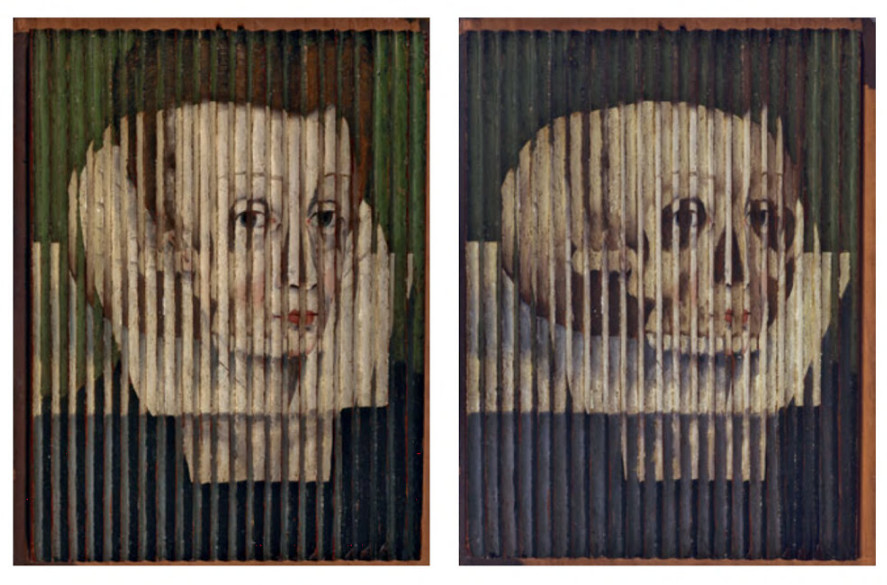
Lentikularna slika
Lentikularna slika je kombinacija više slika preko kojih je postavljena leće kako bi se ostvario doživljaj dubine, pokret ili neka druga promjena, u odonsu na kuta gledanja. Tehnologija se koristi u tisku i u digitalnim medijima (3D ekrani).
Lenticular printing is a multi-step process which consists of creating a lenticular image from at least two images, and combining it with a lenticular lens. This process can be used to create various frames of animation (for a motion effect), offsetting the various layers at different increments (for a 3D effect), or simply to show a set of alternative images which may appear to transform into each other. Once the various images are collected, they are flattened into individual, different frame files, and then digitally combined into a single final file in a process called interlacing.
From there the interlaced image can be printed directly to the back (smooth side) of the lens, or it can be printed to a substrate (ideally a synthetic paper) and laminated to the lens. When printing to the backside of the lens, the critical registration of the fine “slices” of interlaced images must be absolutely correct during the lithographic or screen printing process or else “ghosting” and poor imagery might result. Ghosting also occurs on choosing the wrong set of images for flip.
When most people think of a hologram, they're probably thinking of what's called a lenticular lens print. Lenticular lenses can be used to create the illusion of depth and are the technology that makes possible 3D Game Boys and TV's that don't require special eye glasses.
Optika
Kit
Popis materijala
- lentikularna leća 50 LPI
- folija za kinegram
- probni printevi
Potreban alat
- računalo
- printer (što veće rezolucije)
Odabir i priprema motiva
- 3D ili pokret?
- horizonatlni ili vertikalni smjer animacije (ovisno o orijentaciji leća/folije)
- najčešće manje freame-ova znači bolja separacija slika i manje ghosting-a
- izbjegavajte jaki kontrast (npr. prelaske iz skroz crnog u bijelo)
- efekt je uvjerljiviji kada je prednji plan svjetliji od pozadine
- horizontalna orijentacija leća (pokret gore-dolje) obično izgleda bolje nego vertikalna orijentacija (pokret lijevo desno) (manje ghosting-a)
- zadržite dio slike statičnim (ne animiranim), kako bi služila kao točka reference
- izbjegavajte sitni tekst (horizontalna rezolucija je vrlo mala)
- koristite teksture za pozadini, umjesto punih čistih boja (naročito bijele)
Tipovi efekata
- preokretne slike
- pokretne/animirane slike
- zoom efekti
- morphing slike
- 3D slike
Izrada slika
Proces izrade svodi se …. interlaceanje….
Software
Postoji nekoliko programa namjenjenih stvaranju ovakvih slika. S obzirom na to da je dio tih rješenja kokomercijalan ili rade samo na pojedinim operativnim sistemima – za potrebe ove radionice napravljen je poseban program. On ujedno služiti kao demonstracija stvaranja relativno jednostavnih alata kakve možemo koristiti za postizanje kompleksnih slika.
Program je napisan u Processingu, programskom jeziku prilagođenom radu s grafikom i baziranom na Javi. Kako biste ga koristili potrebno je skinuti i instalirati Processing, te skinuti program i otvoriti ga.
Upute za korištenje
- Pronađite ili kreirajte animaciju, vodeći računa o prethodnim preporukama
- Rastavite animaciju u frame-ove, a fileove imenjte ih počevši od 0. Npr.
0.png1.png2.png - Filove iskopirajte u direktorij naziva vašeg animacije i prebacite u direktorij u kojem se nalazi program Npr.
leticular_processing/moja_animacija - Otvorite program
leticular_processing.pdeu Processingu - Podesite varijable
imagesFolderfileExtensioniframesTotalprema vašoj animaciji - Pokrenite sketch ►
- U direktoriju programa pojaviti će se kompozitna slika i istoimeni tekstualni file sa specifikacijom za print
Related
- 2D lenticular array, micro lenses https://www.youtube.com/watch?v=fJ8TN_ptzfY
- 1D or 2D lenticular array https://www.youtube.com/watch?v=vk5K9ww5QBc
Najčešći problemi
prevent ghosting
Along with moving the camera horizontally it's critical to also have the camera focus on one point in the scene. If you're using three.js - there's a simple camera.lookAt(object) method which allows for this 'focus' very easily. Wherever your camera is focused will become the middle ground in your 3D scene. Things further than this focus point will seem to fall into the lenticular and things closer will pop out of the lenticular. If you are rendering an image of a human head - you may want the focus point to be the center of the head so that the nose and forehead stick out of image and the background recedes into the distance. If you want the head to appear inside the lenticular then use the tip of the nose as the focus point.
After you run the program, open your final output in photoshop and go to Image > Image Size in the top menu. In here, uncheck resample and make the resolution to 300dpi (Processing outputs it at 72dpi naturally). Unchecking this will allow for the pixels to remain unchanged and keep everything crisp for the printer. F
Aligning lens to print
Pitch calibration
The pitch test is conducted once for every printer type, for every paper type, for every type of printer settings and for every lens type.
1D lenticular arrays magnify surfaces
LPI
U ovom slučaju kratica LPI označava broj leća po inču (lenticules per inch). Veći broj označava veću rezoluciju, što ujedno zahtjeva printer veće rezolucije i komplicira proces poravnavanja. Najčešće vrijednosti kreću se od 40–75 LPI.
Napomena: Kratica LPI se često koristi i u klasičnom tisku gdje označava rezoluciju rastera (broj linija tj. rasterskih točkica po inču). Slično, ali nije isto.
1 inč = 2.54 cm
Printanje
Lenticular is a HIGH RESOLUTION process as the lenticular sheet is magnifying the data that is printed to the backside of the lens. Our clients are offset or digital printers, printing at high res. like 400 LPI or even more.
Potrebno je isprintati sliku na točno definiranoj dimenziji ili rezoluciji (tekstuali file uz generiranu sliku), u protivnom slika neće biti funkcionalna. Osim toga, moguće je da sam printer doprinosi malim pomacima pa se ponekad mogu dobiti bolji rezultati ako je još ručno poštima (poveća ili smanji) slika.
Kinegram
Sličan princip. Za vježbu možete probajti modificirati prethodno priloženi program kako bi generirali grafiku za kinegram.
Korisni linkovi
Gdje kupiti leće
- AliExpress
Alternativni programi za generiranje slike
- comercial (demo), win https://triaxes.com/products/3d-software/3dmasterkit/
- free, win http://stereo.jpn.org/eng/stphmkr/
- free, java, win/mac (old) http://lenticularimagecreator.com/
- opensource, processing https://github.com/amandaghassaei/LenticularProcessor
- opensource, processing https://github.com/jesse-harding/LennySuite/tree/master/lenny_suite